Terrain
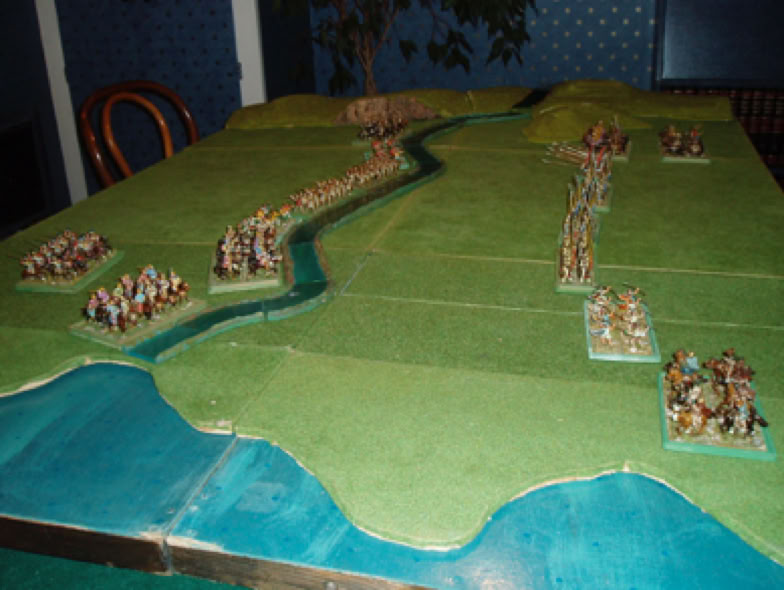
People keep asking how I make my terrain, so here's a quick summary of how it all works. My current system is the product of about twenty years of trial and error.
Just to prove it, here is a little background on the other systems I've tried.
History
I started out with a green painted table with green painted contour hills, taking my cue from Charles Grant's books. This is cheap, simple, very versatile, but looks a bit iffy. Actually, this isn't right. I started out playing on the floor, but the only thing to be said for this is that it gives you a lot of space. With the best will in the world you will tread on things. Don't do it.
Next, inspired by early Miniature Wargames magazines, I built a whole batch of square terrain modules complete with roads and rivers. These look great and are easy to use, but they have two serious problems.
1) As soon as you model hills you can't store them
2) They are fine for scenario games, but useless for reproducing Antietam, Narvik Fjord and other historical setups.
So I reluctantly abandoned the terrain modules and instead bought a big green blanket which was artfully spray painted in patches and draped over my old contour hills.
This was better, and also allows all sorts of things to be used as hills (an upside down Wok makes a fine rounded hill). It also had some problems, though
1) The figure bases catch on the blanket so you can't push unit forward with a stick
2) It is a bit uncertain where a hill begins
3) You can't do water easily
4) My wife pointed out that it looked like a dirty blanket draped over a table
So I went out and bought a couple of big rolls of grass cloth (they were about 17 pounds each at the time) and used those instead. This was better, but disadvantages 2 and 3 were still there, and also the cats liked to go underneath and fight each other.
So finally I came up with my present system.
I'm sure this isn't particularly original. I pinch ideas from wherever I can find them! Bear in mind that I use 25mm figures, so I need a fairly large table on occasion, but not always - sometimes 6x4 is just fine (or even 4x4 on occasion). Mostly, though I use the table in its 6x6 or 6x8 sizes.
The Table
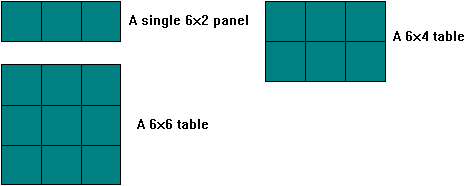
This is made from 4 identical 6 foot by 2 foot panels. They are hardboard, braced with timber underneath. The Timber is stained dark blue so it is unobtrusive. The panels are painted in a gloss blue-green with swirls of a lighter colour to resemble water. The top is also decorated with a pattern of blue dots 2 inches apart in a hex pattern as I find this speeds up naval games a great deal. I lay these panels on the dining table - lengthways for a 6x4 table, or across for 6x6 or 8x6, like so:
The terrain boards
One top of these panels go the terrain squares. These are 2 foot squares of insulation board. Insulation board is ideal as it is light, doesn't warp, and is easy to cut; it can also be hard to find, in which case use 9mm MDF. Be warned that this is much heavier and harder to cut. The boards are covered on one side with the grass cloth (which of course I already had). The other side is covered with sand for desert games. For an 8x6 table you will need 12 of these panels.
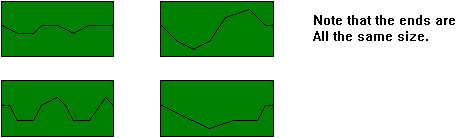
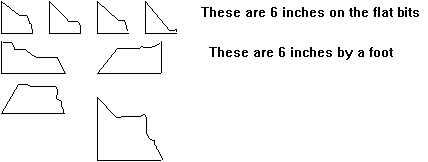
Now, to take advantage of the nice blue tabletop beneath, you need some edge pieces to go round the squares to make rivers and coastlines. Here's the set which I built, which has proved enough so far for everything I've wanted to do:
4 edge pairs, cut from 2x1 sections of insulation board:
I also cut 4 2 foot by six inch pieces. These can be used with the above pieces to change the widths of rivers and other such exciting things.
You will also need some corner and re-entrant pieces, like this:
And finally, some little bits to fill in corners, like this:
A sample battlefield
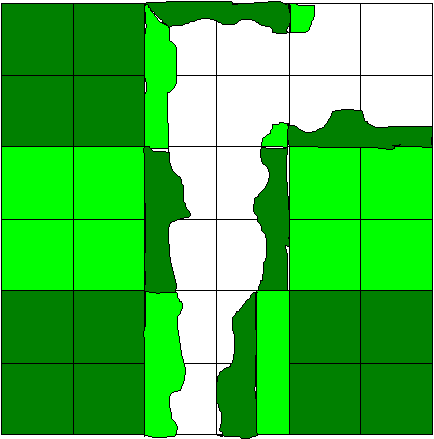
This just illustrates how the boards are used to build up a moderately complex battlefield - in this case a river estuary which widens and kinks sideways. I've used the 'Miser's Gold' layout. I've used two different colours for the various bits so that you cans ee how it all fits together. Notice the use of the corner piece with sloping edge and the 6 inch wide filler bit to produce a nice tapering river.
Another two corner pieces fit together to provide the bend
Hills, rivers and roads
The basic board as described above will give you coasts and wide rivers, but you still need hills, small rivers, streams and roads. There are lots of ways to do these, but I'll describe the ones I've used.
Hills
Contour hills are very practical, easy to make, and look reasonable. Just cuts bits of insulation board and cover with grass cloth or sand. I prefer the look of shaped hills, though, and these are a bit more work. I've tried the plaster-soaked bandage method, and I've also tried covering hills with grass cloth. Neither works terribly well.
So now what I do is use a piece of insulation board and stick expanded polystyrene sheet on top of it; use PVA glue for this- most solvent based glues will melt the stuff - be careful!. Then shape the whole thing with a Surform (if you don't know what one of these is - go to a DIY shop and look for something that looks like a thin cheese grater with a handle). This is a very messy process, best done out of the house - the polystyrene goes everywhere.
Once finished, I paint the whole thing with green emulsion, then coat with wallpaper paste (you can use PVA, but I find wallpaper paste works better) and cover with scatter grass. Scatter grass is the same stuff as comes stuck to the grass mats. It looks much better than flock. I use a paler colour for my hills than for the grass cloth as this seem to look better. You can buy it in modelling shops.
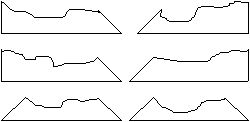
I made a selection of hills - some low ones (on which troops can stand without too many problems) and some steeper ones. I also made some in sections with a common end profile. There are a bunch of end pieces of different shapes plus a ridge (with cliffs on one side) and a T-shaped piece with a steep gullied slope. These can either be used as hills coming in from the edge of the table, or butted together to make long ridges.
Rivers
I made these a long time ago from plywood with banks made from filler. They are painted a muddy blue-green and varnished. There are straights, curves, fords, branched bits and so on. These are incredibly durable and can be thrown at your opponent if he cheats without damaging them. Mine are about 3 inches wide.
Streams
I pinched this idea straight from the Fire & Fury rule book. Cut strips of thin acrylic, with rounded ends, about an inch and a half wide. Paint the base muddy brown. Umm... that's it. Looks good on table.
Roads
I used to use card for these. It looks good but it always drifts apart in the heat of battle, and it won't go over hills easily. So.... I switched to strips of felt. A metre square will give you more than enough roads. Cut into strips (mine are 40mm wide). Using dilute acrylics, paint ruts, bits of grass. You will need some curves as well as straights of varying lengths. The felt has two huge advantages over card:
1) It clings to the grass cloth just like those old fuzzy-felt toys. No more moving roads!
2) It goes over hills.
And that's about it. You will need other stuff, of course. Fences, fields, stone circles..... but I'm sure you can work those out for yourself.